Fabric Scrap Headband With a Twisted Front and Elastic Back
Sew a twisted-front headband from two long fabric strips and a short elastic casing. Includes a sizing table and a no-elastic version for knit scraps.
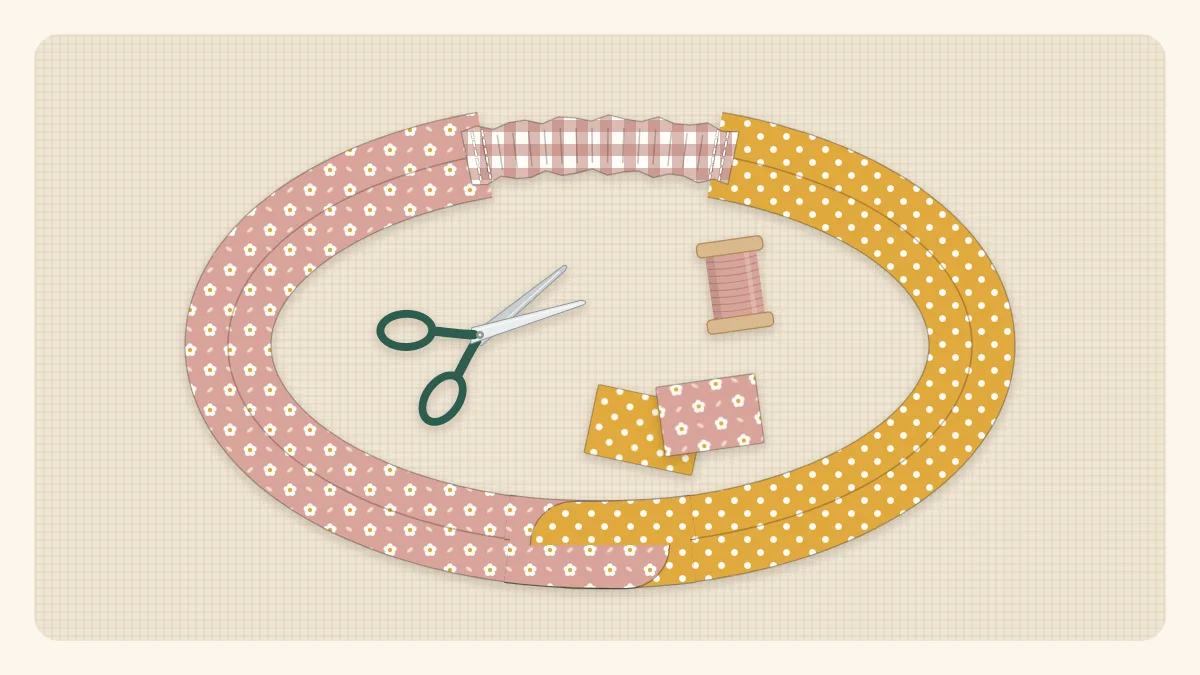
Project at a glance
Materials
- 2 fabric strips 4.5 x 17 in (11.5 x 43 cm)
- 1 fabric strip 5 x 9 in (12.7 x 23 cm) for the casing
- 5 in (12.7 cm) of elastic, 3/4 to 1 in wide
- Thread, pins or clips
- Safety pin for threading elastic and turning tubes
- Iron
Two long strips and one short one are all it takes to make a fabric scrap headband with a twisted front and a comfortable elastic back. The twist looks like a knot but is really just two fabric tubes looped through each other, so there is nothing to tie and nothing to come undone. Because the back is elasticated, ordinary woven quilting cotton works well, and the fit is forgiving.
Woven or knit scraps?
The fabric decides how the headband is built.
- Woven scraps (quilting cotton, lawn, chambray, lightweight linen) do not stretch, so the band needs the elastic section at the back. This is the version in the main tutorial.
- Knit scraps (cotton jersey, old T-shirt fabric) stretch on their own. The elastic can be left out and the band ends sewn straight together. See the knit variation further down.
Avoid stiff or heavy fabrics such as canvas and denim, which feel bulky in the twist.
Sizing
Measure around the head where the headband will sit, over the hair, from the forehead hairline round to the nape of the neck. The finished headband should measure about 2 inches (5 cm) less than the head when relaxed, so the elastic holds it gently in place.
| Head measurement | Cut 2 band strips | Elastic length | Relaxed size |
|---|---|---|---|
| 19 to 20.5 in (48 to 52 cm) | 4.5 x 15 in | 4.5 in | about 17.5 in |
| 21 to 23 in (53 to 58 cm) | 4.5 x 17 in | 5 in | about 20 in |
| 23 to 24 in (58 to 61 cm) | 4.5 x 18 in | 5.5 in | about 21.5 in |
The casing strip is the same for every size. For a fit in between, change the elastic length by 1/2 inch rather than recutting the fabric.
Materials and cutting list
- Band: 2 strips, each 4.5 x 17 inches (11.5 x 43 cm) for the middle size
- Elastic casing: 1 strip, 5 x 9 inches (12.7 x 23 cm)
- Elastic, 3/4 to 1 inch wide: 5 inches (12.7 cm) for the middle size
- Thread, pins or clips, a safety pin, iron
- A turning tool or a second safety pin for turning the tubes
The two band strips can be the same print or two different ones. Strips can also be pieced from shorter scraps; press those seams open before sewing the tubes.
How to sew the headband
Use a 1/4-inch seam allowance throughout.
- Sew the band tubes. Fold one band strip in half lengthwise, right sides together, and sew down the long edge. Repeat with the second strip. Leave the short ends open.
- Turn and press. Turn each tube right side out. Roll the seam to the middle of one side and press flat. Each tube is now 2 inches (5 cm) wide, and the side with the seam is the back.
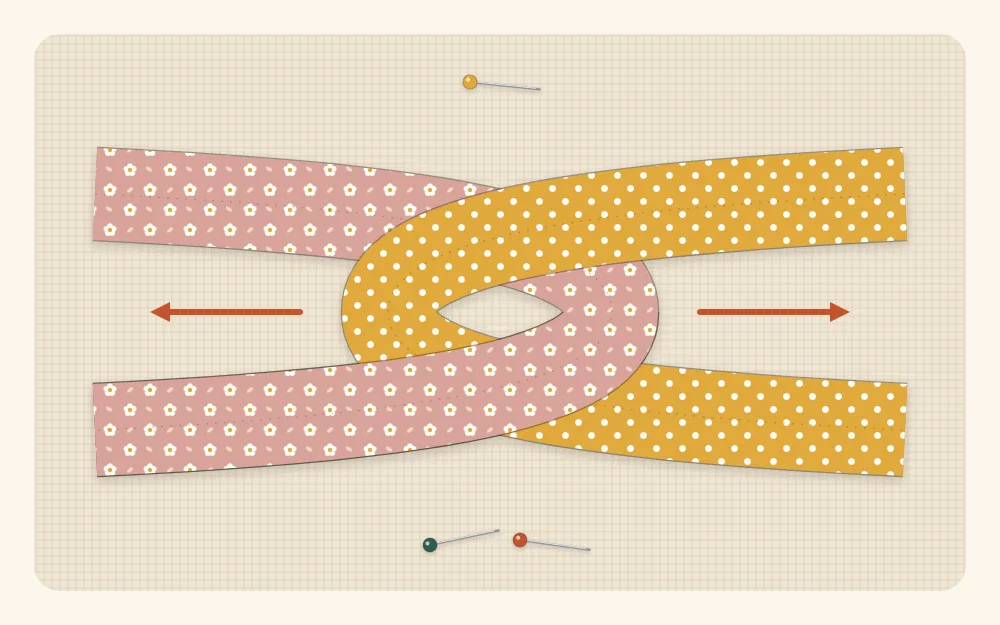
- Make the twist. Fold the first tube in half crosswise, seam side inside, and lay it down as a sideways U with its ends pointing left. Thread the second tube through that U, then fold it in half as well, seam side inside, with its ends pointing right. The two folded tubes are now linked like two links of a chain.
- Baste the ends. On each side, stack the two ends of the same tube exactly on top of each other and stitch across them 1/4 inch from the raw edge. Each side of the band is now about 8.25 inches long and two tubes thick.
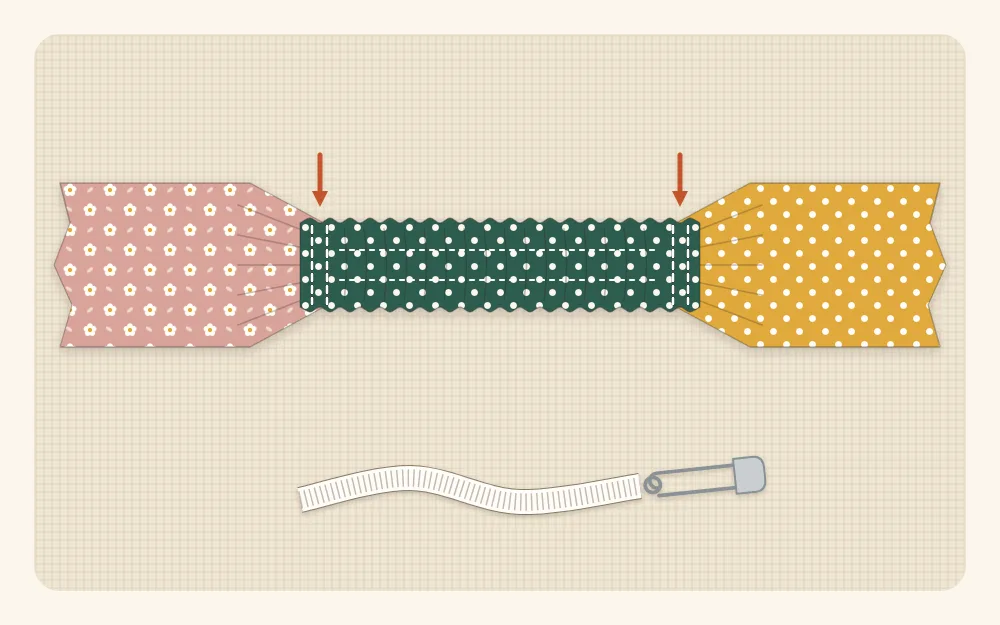
- Sew the casing. Fold the casing strip in half lengthwise, right sides together, sew the long edge, turn right side out and press with the seam centered on the back. The tube is 2.25 inches wide. Turn both short raw ends 1/2 inch to the inside and press, leaving a casing 8 inches long with neat folded ends.
- Thread the elastic. Fasten a safety pin to one end of the elastic and feed it through the casing. Pin the first end of the elastic just inside one folded end of the casing so it is hidden but right up at the fold.
- Join the first side. Slide one basted band end 3/4 inch into the same opening, lying on top of the elastic, with the back of the band matching the seam side of the casing. Sew across the casing 1/4 inch from the fold, then again 1/2 inch from the fold, backstitching at both ends. Both lines should catch the casing, the band and the elastic.
- Join the second side. Pull the elastic through until its free end sits just inside the other folded end; the casing will gather up. Pin it, check that the band is not twisted, insert the second band end 3/4 inch, and sew the same two lines.
Tip
Try the headband on before sewing the second side. With the elastic pinned and the band end slipped into the casing, it should feel snug but not tight. Shorten or lengthen the elastic by 1/2 inch at this point if needed.
For the middle size, about 15 inches of band shows once 3/4 inch at each end is inside the casing, and the 5-inch elastic brings the relaxed headband to about 20 inches around.
Knit variation without elastic
For stretchy jersey, cut two strips 4.5 inches wide and about 3/4 inch shorter than the head measurement, with the stretch running along the length. Sew and link the tubes as in steps 1 to 4. Then place the two basted ends right sides together and sew them with a 3/8-inch seam, using a narrow zigzag or stretch stitch and a ballpoint needle. Press the seam to one side. Jersey varies a lot in stretch, so pin the ends and try the band on before sewing; trim a little off if it feels loose.
Watch out
Do not press directly on elastic with a hot iron; heat can weaken it. Press the casing before the elastic goes in. A headband for a baby or young child should be loose and comfortable, and should not be worn during sleep.
Common mistakes
- The twist looks flat. The tubes were pulled too tight when the ends were basted. Leave the link relaxed so it stays plump.
- Seams showing on the front. Keep the seam side of each tube folded to the inside of its U.
- Elastic pulling out. One line of stitching missed it. Feel for the elastic end before sewing, and make sure both lines cross it.
- Tubes that will not turn. Pin a safety pin to one end, push it back through the tube and pull. Narrower strips are much harder, so keep to the 4.5-inch width.
Variations
- Use two contrasting prints so the twist shows clearly. The guide to combining scrap fabric colors explains how to pick a light and a dark that set each other off.
- Skip the twist: use one tube cut 4.5 x 16 inches, and join it to the casing at each end.
- Make a matching scrap fabric scrunchie from the trimmings; it needs only a narrow strip and a short piece of elastic.
A headband takes little fabric and less than an hour, which makes it a good candidate for a batch of handmade presents. More small accessories are collected in the roundup of scrap fabric gift ideas.
Frequently asked questions
How long should the fabric be for a headband?
For an adult head of 21 to 23 inches, cut two band strips 4.5 x 17 inches and use 5 inches of elastic in a 9-inch casing. The relaxed headband measures about 20 inches, roughly 2 inches less than the head.
Can a headband be made from woven cotton?
Yes. Woven cotton does not stretch, so it needs a short elasticated section at the back. Knit fabric such as jersey stretches enough to be made without elastic.
How is the twisted front made?
Two fabric tubes are each folded in half and looped through one another like two links of a chain. The four ends are then stitched in pairs, so the twist cannot come undone.