Fabric Scrap Bunting: Pinked or Lined Triangle Pennants
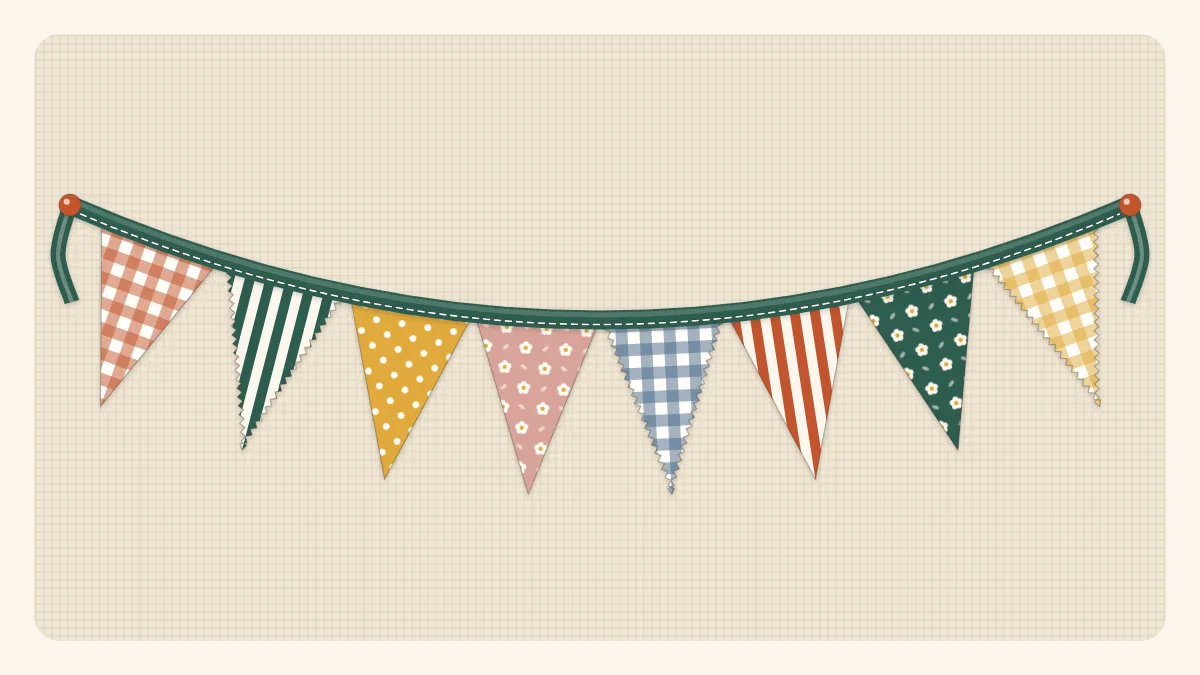
Make triangle pennant bunting from mixed scraps, with a simple template, a quick pinked version, a lined version and a tape header.
Project at a glance
Materials
- Fabric scraps at least 6 x 7 in (15 x 18 cm): 9 or 18
- 2.5 yd (2.3 m) double-fold bias tape, about 1/2 in (12 mm) wide folded, or 1 in (2.5 cm) twill tape
- Cardstock, pencil and ruler for the template
- Pinking shears (single-layer version)
- Scissors or rotary cutter and mat
- Thread, clips or pins
- Point turner or chopstick
- Iron
Few projects use up mid-sized remnants as cheerfully as fabric scrap bunting. A string of triangle pennants can be cut from pieces too small for much else, every print in the bin is welcome, and the sewing is all straight lines. There are two ways to make it: a quick single-layer version with pinked edges, and a lined version with turned, finished pennants that hangs flatter and lasts longer. Both use the same template and the same tape header.
Which version to make
| Pinked, single layer | Lined and turned | |
|---|---|---|
| Triangles to cut for 9 pennants | 9 | 18 |
| Finished pennant | 6 in wide, 7 in tall (15 x 18 cm) | About 5.5 in wide, 6.5 in tall (14 x 16.5 cm) |
| Back of the pennant | Wrong side of fabric shows | Finished on both sides |
| Rough time | About 1 hour | 2 to 3 hours |
| Best for | Parties, indoor walls, quick decorating | Bunting that is washed and reused |
Materials
- Fabric scraps at least 6 x 7 inches (15 x 18 cm) each: 9 for the pinked version, 18 for the lined version
- 2.5 yards (2.3 m) of double-fold bias tape about 1/2 inch (12 mm) wide when folded, or 1-inch (2.5 cm) twill tape pressed in half lengthwise
- Cardstock or thin cardboard for the template, pencil and ruler
- Pinking shears for the single-layer version
- Scissors or a rotary cutter, ruler and mat
- Thread, clips or pins, a point turner or chopstick, iron
Quilting cotton is ideal. For the pinked version, choose tightly woven fabrics and prints that look acceptable from the back, since the wrong side is visible. Loose weaves fray past a pinked edge quickly.
Make the template
- On cardstock, draw a horizontal line 6 inches (15 cm) long. This is the top of the pennant.
- Mark the center of the line at 3 inches (7.5 cm).
- From that center mark, measure straight down 7 inches (18 cm) and make a dot.
- Join the dot to each end of the top line. Cut the triangle out.
The same template serves both versions. In the lined version, the 1/4-inch (6 mm) seams along the two long sides bring the finished pennant down to roughly 5.5 inches wide.
Cut the triangles
For single scraps, trace around the template and cut. For a larger remnant, cut a strip 7 inches tall and nest the triangles point to point: the first with its point down, the next with its point up, sharing the slanted cutting line. Each additional triangle adds only 3 inches (7.5 cm) of strip length, so nine triangles fit in a strip about 30 inches (76 cm) long.
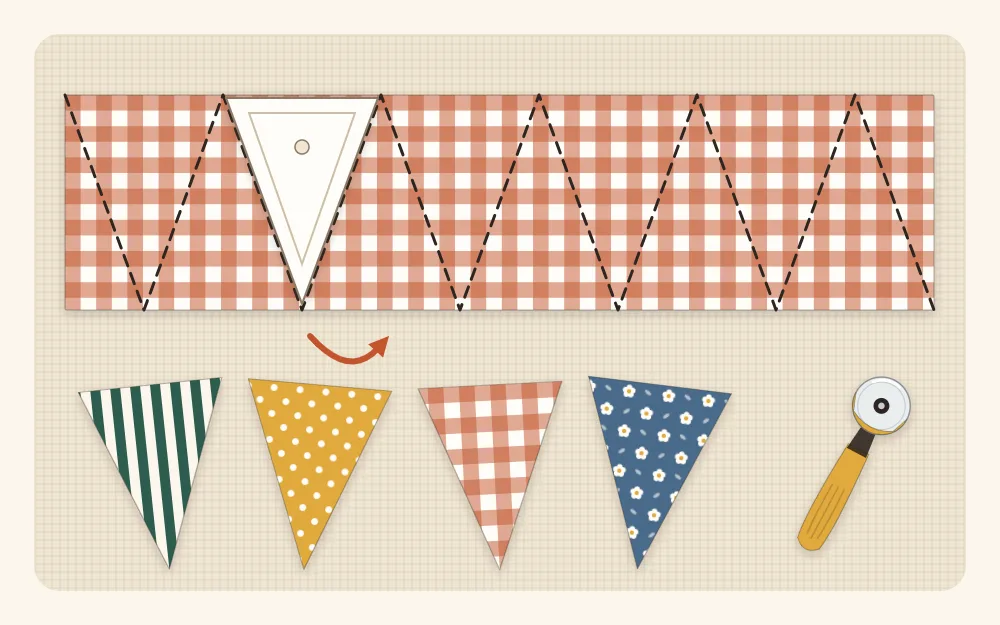
Directional prints, such as stripes or motifs with a clear top, should all be cut with the point down, which uses a little more fabric. For the pinked version, cut the two long sides with pinking shears and leave the top edge straight.
Watch out
When cutting slanted lines with a rotary cutter, hold the ruler firmly with fingers spread and well back from the edge, and close the blade guard after every cut.
Sew the lined pennants
Skip this section for the pinked version.
- Pair the triangles. The backs can be the same print, a different print or a plain fabric.
- Place each pair right sides together. Sew down one long side with a 1/4-inch seam, stop 1/4 inch from the point with the needle down, pivot, and sew up the other side. Leave the top edge open.
- Trim the seam allowance at the point: cut straight across just below the stitching, then taper the sides for about 1 inch (2.5 cm). Without this, the point stays blunt and lumpy.
- Turn the pennant right side out through the top. Ease the point out with a point turner or chopstick, pushing gently.
- Roll the seams to the edges and press flat. Trim the small seam-allowance tabs that stick out above the top edge so the top is one straight line.
Tip
Chain the pairs through the machine one after another without cutting the thread, then snip them apart and press them all in one session. Nine pennants take barely longer than three.
Plan the spacing
Lay the pennants out in a row before sewing and shuffle them until no two similar prints sit side by side. Alternating light and dark fabrics helps the string read clearly from across a room; the guide to combining scrap fabric colors covers this in more detail.
- Leave 12 inches (30 cm) of tape free at each end for tying.
- Leave a 1-inch (2.5 cm) gap between pennants. Butting them edge to edge gives a fuller look and a shorter string.
- Nine lined pennants with 1-inch gaps cover about 58 inches (147 cm). Nine pinked pennants cover 62 inches (157 cm). With the ties, both fit on 2.5 yards of tape.
For a different length, multiply the pennant width by the number of pennants, add the gaps, and add 24 inches (60 cm) for the two ties.
Attach the header tape
- Fold the tape in half crosswise to find its center and mark it with a pin. Center the middle pennant on that mark.
- Open the fold of the tape. Tuck the top edge of each pennant all the way into the fold, about 3/8 inch (1 cm) deep, and clip. Work outward from the center, measuring the gaps.
- Tuck in the raw short ends of the tape by 1/4 inch at each end.
- Starting at one end, stitch along the whole length of the tape, close to its open edge, about 1/8 inch (3 mm) in. Check now and then that the stitching is catching the back fold of the tape as well as the front.
- Backstitch at both ends and press the header.
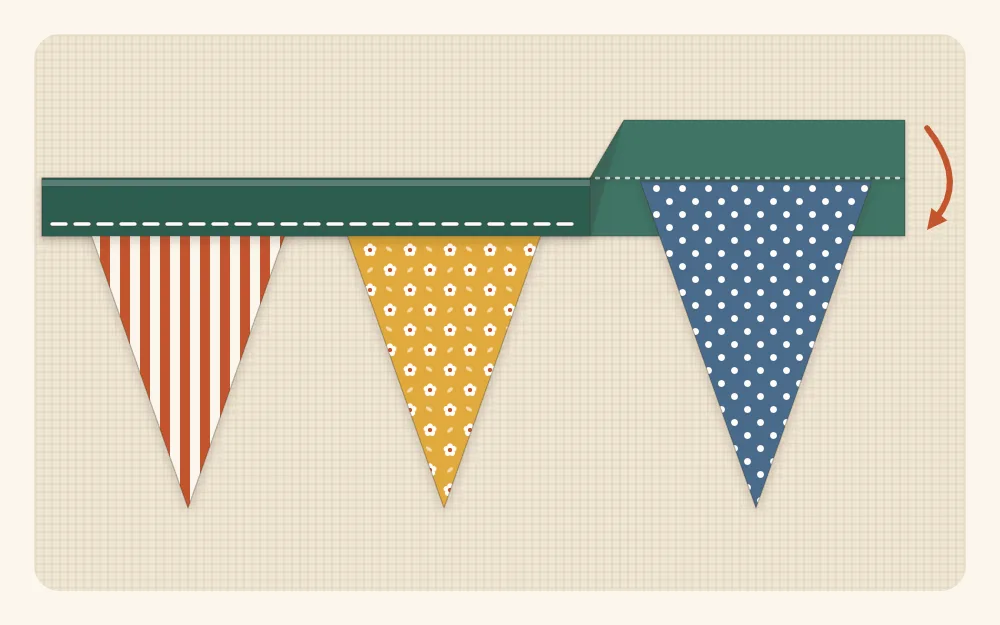
Double-fold bias tape is usually folded slightly off-center. Put the narrower side on top while sewing, and the wider side underneath is caught without effort. A narrow zigzag is a forgiving alternative to a straight stitch.
Common mistakes
- Blunt points. The seam allowance at the tip was not trimmed before turning.
- Pennants falling out of the tape. The tops were not pushed fully into the fold, or the stitching ran too close to the edge and missed the back.
- A wavy header. Bias tape stretches. Let the machine feed it without pulling, and press it afterward.
- Uneven gaps. Spacing was judged by eye. A 1-inch strip of cardstock makes a quick spacer.
- Upside-down prints. Check directional fabrics before cutting; the top of the motif belongs at the wide edge.
Variations
- Mini bunting. Draw the template 3 inches wide and 4 inches tall (7.5 x 10 cm) for a shelf, a mantel or a child’s room, and use narrower tape.
- Appliquéd pennants. Add a simple fused shape to each pennant before sewing; the method is in scrap appliqué for beginners.
- Seasonal sets. Rust, mustard and green for fall; reds and creams for winter. The same palette pairs well with stuffed fabric hearts strung between pennants.
- No machine. A knotted strip garland gives a similar effect without any sewing and is described in the roundup of no-sew fabric scrap projects.
Cotton bunting is best kept for indoor use or brief outdoor occasions; sun and rain fade and fray it. Hang it out of reach of young children, as with any long cord.
Frequently asked questions
What size should bunting triangles be?
A triangle 6 inches wide at the top and 7 inches tall is a good all-purpose size for a wall or doorway. For shelves and mantels, a mini version 3 inches wide and 4 inches tall works well.
How much bias tape is needed for bunting?
Multiply the pennant width by the number of pennants, add the gaps between them, and add about 24 inches for two ties. Nine pennants of this size with 1-inch gaps fit on 2.5 yards of tape.
Do bunting pennants need to be lined?
No. Single-layer pennants cut with pinking shears are quick and fine for parties and indoor walls. Lined pennants take longer but are finished on both sides, hang flatter and hold up better to washing.
Can bunting be made without bias tape?
Yes. Twill tape pressed in half lengthwise works the same way, as does a long folded strip of fabric with its raw edges pressed to the center.